Tidal Treasure Clash
Devlog 2: Prototyping!
Introduction
This week we focused on prototyping. The art team focused on writing the art bible for our game which will make our workflow better, smoother and faster down the line. They also started working on the environment shader that will be used for a majority of the environment in the game.
The programmers focused on a few of the core mechanics we still had no idea how they would work out and how we would proceed with them. This includes the weapons and how they affect the player and interact with the environment and also our local multiplayer system.
Programming
Attacking and active ragdolls
After setting up the physics animation component to our character in unreal last week we can now try to add mechanics to our character.
Picking up objects
The first mechanic is picking up objects. When the f key gets pressed a sphere trace detects any physical bodies near the character. If the trace hits one we can now proceed to attach the object to the player. For this there are multiple approaches.
The first approach is to use a physics constraint. This forms a type of joint between a bone of the characters skeleton and the physics body that was hit by the trace. When testing this it only seemed to work if the bone was high enough, otherwise the object would just disappear. Another problem is that the object still gets physics simulated and has a hitbox, which means that it can influence the character itself and send it flying.
The second approach is to use a physics handle. With this method we need to update the location of the handle itself every tick otherwise it doesn’t match the animations. As with the first approach the object still gets simulated and thus it can influence the character and push it away.
For these two methods there is still something we can test with collision ignore groups.
The third method is attaching it to a socket. Here the object snaps its root to the specified socket. Normally the physics bodies should be able to weld together and make it so that the object becomes part of the active ragdoll but this feature doesn’t appear to work at runtime. So the remaining option with this approach is to disable physics simulation and change the collision profile. If we keep the physics simulation the physics body will just fall to the ground and if we keep the collision preset any movement of the object will apply way too much force on physics bodies in the scene.
So far the last approach seems the best fit.
Attacking
The attacks of the character are very dependent on how it pick up objects. So far we only prototyped it with the last approach of picking things up. A sphere trace sweep is used to check if the weapon hits anything. The trace location is determined by 2 sockets on the weapon mesh.
When the player presses the attack button an animation starts playing. This moves the weapon with it. While it’s moving we sweep a sphere trace from the start to the end socket of the weapon.

We still have the question of how to make it look more physics based and ragdoll like when a character gets hit. This can be done by adding an impulse to the character that gets hit.
Another idea we have to test is to attach another invisible actor to the weapon and have it collide with the physics bodies.
Multiplayer
This week we also started working on multiplayer. Totally smooth experience...
We managed to get a basic multiplayer system working where a few players could play together and control different characters using different controllers (keyword "controllers"). The issue that we ran into is that we can't separate the keyboard from the first gamepad we use when controlling the first player. Good thing Unreal Engine thought ahead and created this nifty feature in the engine called "skip assigning gamepad to player 1" which solves this exact problem. Amazing right?! Yeah it's been broken since UE5.1.
This is not a big issue, as our original goal was to have players play with a controller but also implement keyboard so that it could be played on PC, which it still can; With a controller.
We can forgive epic games. They're probably just an indie company.
We will still continue to look for a workaround for this issue, but our priority right now is to implement this system on our existing main prototype and see how the players behave with each other when colliding and fighting, to finally start getting a clearer picture of what our game will feel and play like.
Art
Hey everyone, last week we gave you a small preview of our style and the water shader. We mentioned last week that today we will take a look at post-processing and animations. However, we are not going to be doing that today! Instead we will talk a bit about the art-bible and showcase a prototype of our environment shader! But don’t worry, we will definitely be talking about animation and post-processing at some point, so stay tuned for that!
Art-bible
This week our artist Joshua focused primarily on the art-bible. We were required to finish the document at least 50% and we are excited to show you some of the progress that has been made!
Colors: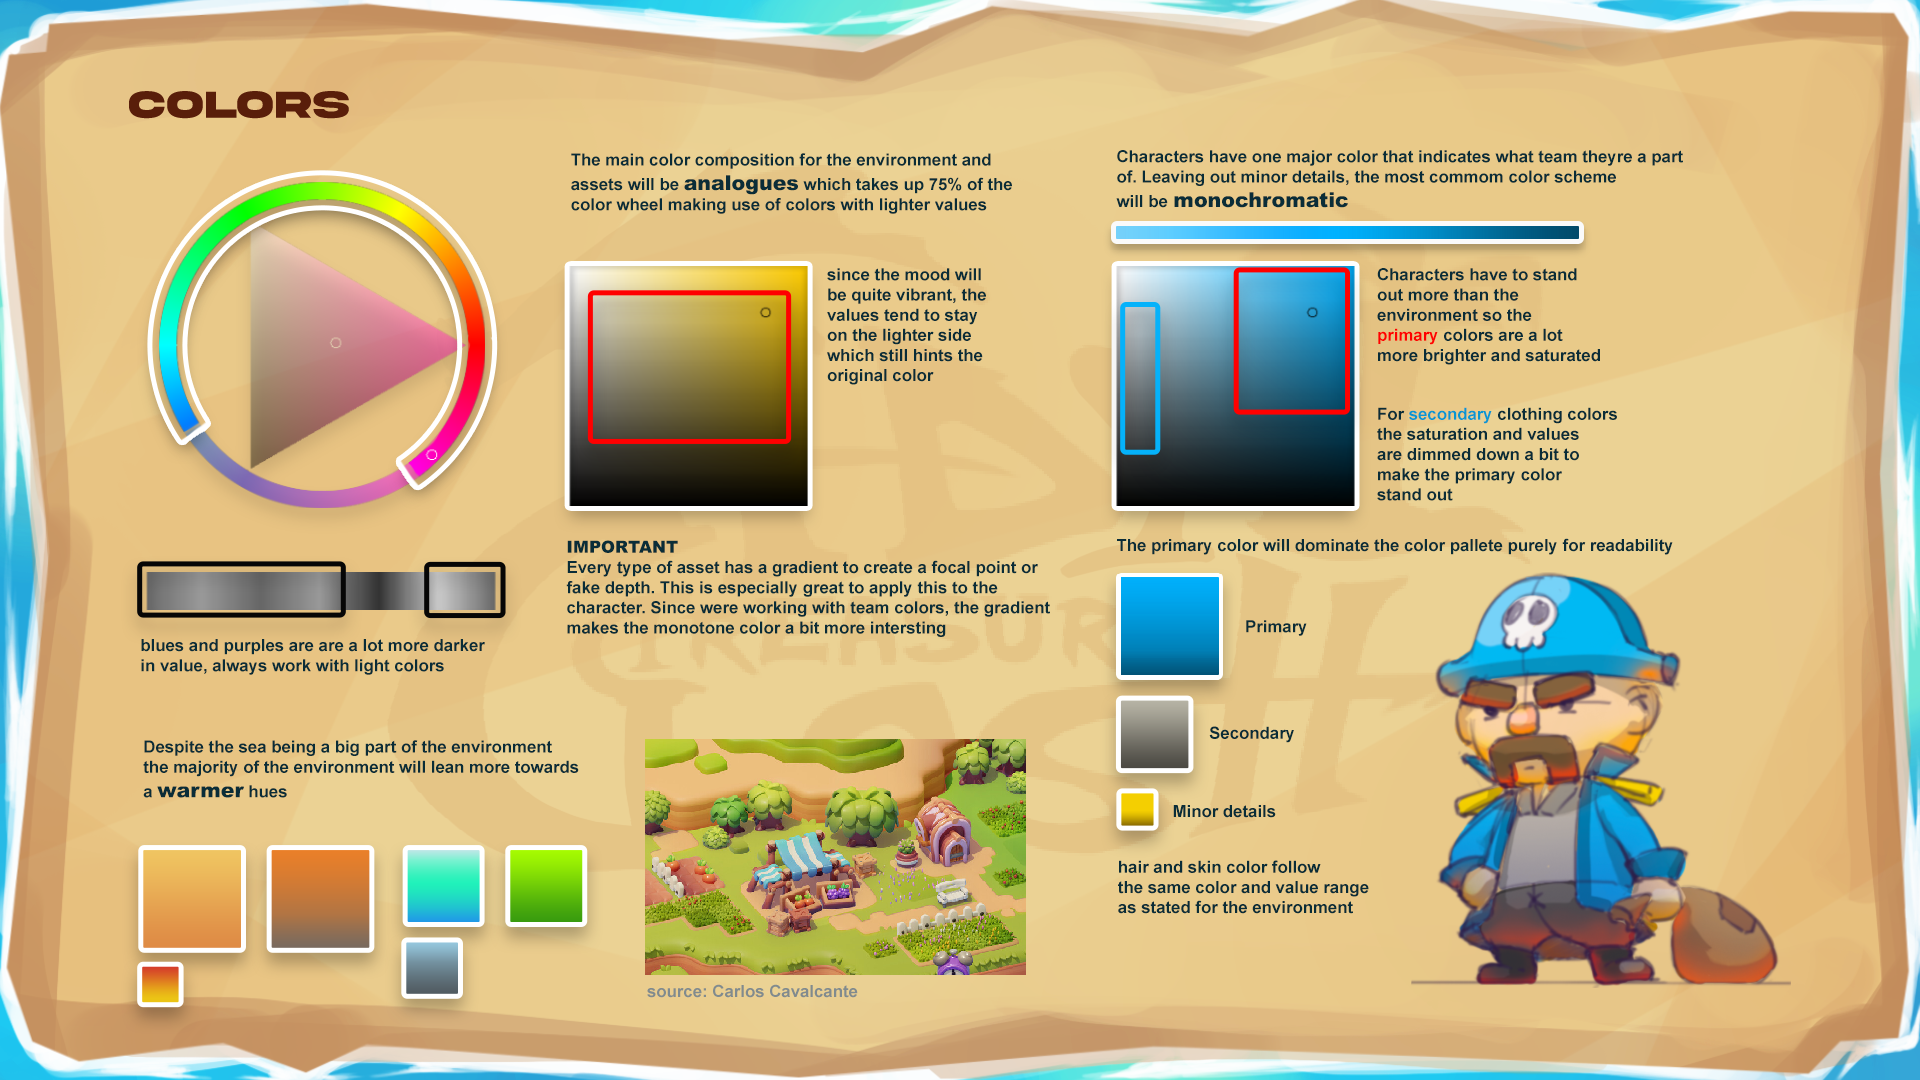
We wanted to keep our game colorful by mainly using lighter valued colors. That is why we chose such an expansive color palette. To achieve that we avoid darker values on the color wheel like dark blues and purples. To create more depth in the colors themselves we use gradients to create a focal point. To set the characters apart from the background/environment we use a monochromatic color scheme with more saturated and lighter values. For the characters we also use gradients for the same reasons. Since we have two teams in our game, both teams will be assigned their own color (e.g. team blue, and team red).
Environments: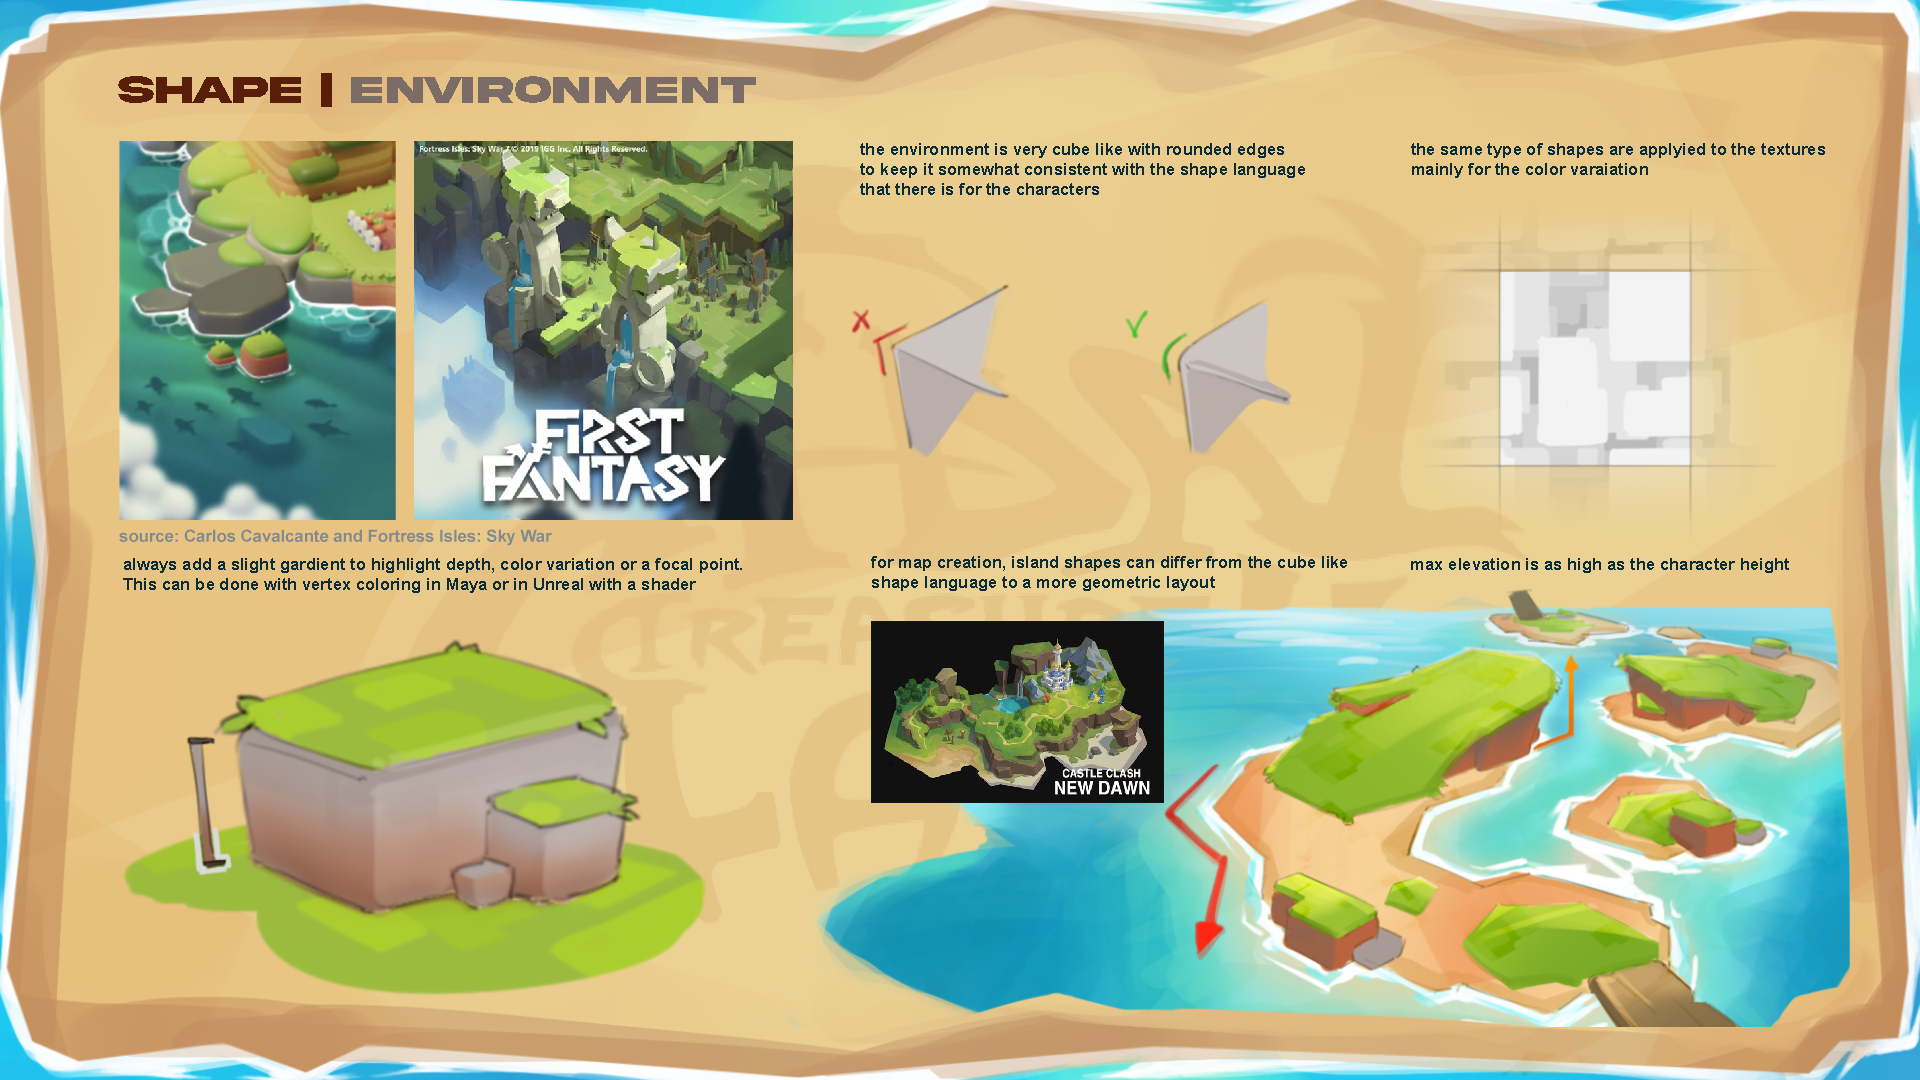
The most important part here is the shape language, meaning the chamfer/bevel on the corners of all our objects, to keep it consistent with the overall art-style. The general shape language is as you might be able to tell is very rectangular, to indicate the stability the environment portrays. This art-style also allows us to prototype a lot faster since we can do it directly in engine with the basic shapes it ships with.
Character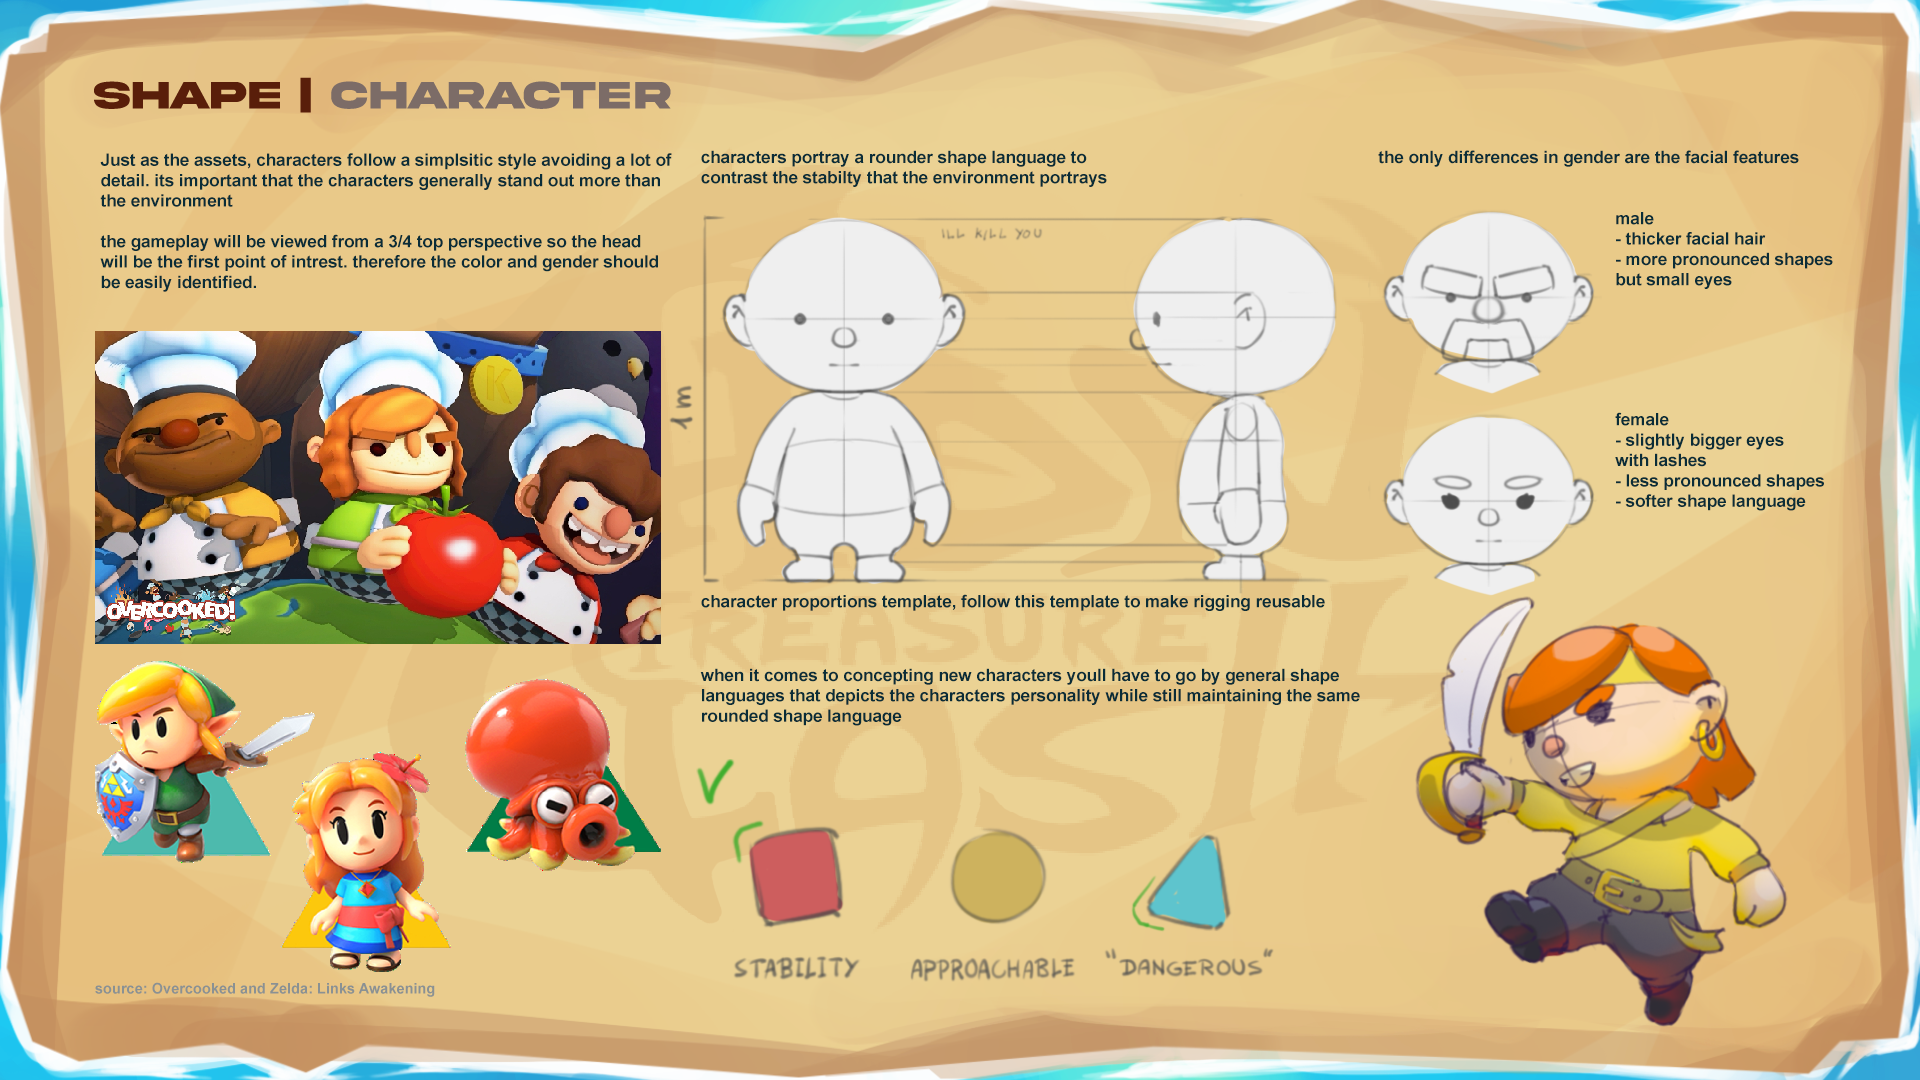
As you can see, our characters have big heads. We did this for two reasons: To create a focal point, and to be able to see the characters more clearly. Since our game will be viewed from a ¾ top perspective, characters will be small on screen. That’s why it is important to us to use a round shape language that makes them stand out from the rest of the game. This also contrasts the character from the environment.
For now, we have 50% of our art bible complete, but there is still a lot to do. Next week we will have pages for the following topics:
- Scale & Proportions
- Realtime Effects / Particle Effects
- Atmosphere / Lighting
- User Interface
- Composition / Camera
Environment
Our other artist Jay took some time to prepare a basic prototype of our environment shader. The creation of such a shader makes it so that we can work very iteratively and spend less time on the boring parts of asset creation, such as baking textures or UV-unwrapping models. In order to make the shader we first had to decide on what kind of controls we wanted to have over it. After some thinking we settled on the following main ones: color, tile contrast and tile scale. Here you can see a gif of the shader working in engine:
As you cans see we have two options for color; the top color and the bottom color. If you look back at the color page in the art-bible you can see that we briefly discuss gradients. This quick prototype reflects an implementation of that idea. Moreover, within this shader you also have control over the size of the gradient, making it so it’s very easy to adjust on a per-asset basis. On the environments page of the art-bible you can also read about the tile pattern that is present on environmental assets. This is also implemented in the shader and with it you can control the contrast and the size of the texture.
The above gif largely shows the same concepts but for another material. The shader is set up so that the user has controls over whether it is supposed to be grass or not. For presentation purposes we altered the colors of the grass so you can more easily see what’s going on. As you can see the shader is able to dynamically shade the top parts of a mesh in a different color. Under the hood this outputs a black and white mask which is then used to assign different colors to different parts as well as overlay the tile texture on the top. That was our very simplified explanation of how the shader works, and we hope we didn’t bore you to death with the technical stuff!
What’s next for our artists?
As mentioned earlier, we still have a lot of stuff to do, mainly for our art-bible. Next week we hope to complete the remaining pages of that, and then Joshua will move on to post-processing for the storm event and Jay will take a further look at animations. We hope you enjoyed this little look into the process, and we hope to see you next week!
Leave a comment
Log in with itch.io to leave a comment.